I’ve always had a thing for chemistry. It might have been the beakers and erlenmeyer flasks my dad would bring home and set on his workbench. Or maybe the beautiful way it seemed to explain the world. Either way, I love chemistry. Which is probably why I love baking. Baking is edible chemistry.
I love a good challenge in the kitchen. Laminating dough for croissants, perfecting royal icing, tempering chocolate, and anything caramel. Caramel sauce, caramel candies, caramel filling, I love making it all because caramel is a challenge. (It also smells like some of my earliest forays into chemistry experiments).
This holiday season, I made a great deal of caramel in a great many varieties. These apple cider caramels are my favorite, but, in the interest of full disclosure, I love pretty much anything apple. This recipe takes time to make, but it is so worth it. Hide-them-in-the-back-of-the-uppermost-cabinet worth it.
I like to make my caramel in an enameled cast iron dutch oven for its heavy bottom and even heating ability. I have both a Staub and a Le Creuset dutch oven, and I prefer using the Le Creuset for caramel because the light colored interior allows me to easily judge the color of the sugar as it caramelizes. If you don’t have a dutch oven, any heavy bottomed large saucepan will do, but make sure it has at least twice the volume capacity as the volume of liquids you will be adding. Caramel bubbles violently when cream is added to the melted sugar, and if you don’t have a large enough pan, you’ll end up with a painful mess.
Have everything prepared before you start caramelizing the sugar. Line and butter the pan that you’ll be pouring the caramel into. Get all the ingredients measured and nearby. Have all your utensils at the ready (a whisk and a heat-proof rubber spatula are essential). Make sure you understand the markings on your candy thermometer and can recognize the correct temperature at a glance. And make sure your candy thermometer reads true. (The manufacturer should have instructions on testing it, but an easy test is to boil water and observe whether it reads accurately and immediately. Some thermometers have a delay, and when making caramel, even a few extra seconds can ruin the final texture by taking the caramel above the desired temperature).
Caramel is a challenge because it can work perfectly one time and seize (sugar harden) the next, but a little confidence and persistence goes a long way. And the results are worth the occasional headache.
Apple Cider Caramels
Yield: about 120 caramels
Ingredients
8 cups apple cider
1 tsp. ground cinnamon
2 tsp. flake sea salt, such as Maldon
16 Tbsp. unsalted butter, sliced
2 cups granulated cane sugar
1 cup packed light brown sugar
2/3 cup heavy cream, not ultrapasturized if possible
Instructions
Add the apple cider to an enameled cast iron dutch oven or heavy bottomed saucepan, at least 5 quart capacity. Bring the cider to a boil over medium-high heat. Allow to boil, stirring occasionally, until the cider has reduced to a dark, thick syrup. By volume it should reduce down to 2/3rd to 1 cup of syrup. I ladle it into a measuring cup to check volume. It can take 2+ hours to reduce to the correct volume. (Note: for a more intense cider flavor, reduce it to 2/3rd cup, for a less intense flavor, reduce it to 1 cup).
While the cider is reducing, a 9×13 baking dish. Cut parchment paper to fit the bottom of the dish. I butter the entire dish, place down the cut parchment paper, and then butter around the edges to “seal” the parchment to the dish so that no caramel gets under the parchment paper.
When the cider has reduced, remove the pan from the heat and add in the butter, sugars, and cream. Affix your candy thermometer to the side of the pan being sure not to let the bulb touch the bottom of the pan. Stir to mix, and then occasionally until the mixture registers at 252 F. (This is where you need to really pay attention and know your thermometer. If it is slow to register, you’ll pass 252 F without knowing it and end up with hard candies). Once it reaches 252 F, remove it from the heat immediately and stir in the cinnamon and salt. Carefully pour the mixture into your prepared baking dish, using a heat proof rubber spatula to scrape every last bit into the dish. (I often enlist a helper because holding a dutch oven in one hand while scraping with the other is cumbersome).
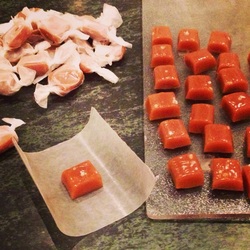
Let the caramel set for 30 minutes to an hour before sprinkling with additional flake sea salt. If you add it too soon, it won’t set on top of the caramels. Allow the caramels to cool fully. When ready to cut, remove the slab of caramel from the dish onto a cutting board. Slice into 1 inch strips using either a lightly buttered knife or pizza cutter, or a knife that has been warmed over a flame or via hot water. Slice each strip into 1 inch squares. Wrap in parchment paper or wax paper squares. (I’d pre-cut these while the caramel is cooling). Store at room temperature or in the refrigerator.
Slightly adapted from: Annie’s Eats
I love a good challenge in the kitchen. Laminating dough for croissants, perfecting royal icing, tempering chocolate, and anything caramel. Caramel sauce, caramel candies, caramel filling, I love making it all because caramel is a challenge. (It also smells like some of my earliest forays into chemistry experiments).
This holiday season, I made a great deal of caramel in a great many varieties. These apple cider caramels are my favorite, but, in the interest of full disclosure, I love pretty much anything apple. This recipe takes time to make, but it is so worth it. Hide-them-in-the-back-of-the-uppermost-cabinet worth it.
I like to make my caramel in an enameled cast iron dutch oven for its heavy bottom and even heating ability. I have both a Staub and a Le Creuset dutch oven, and I prefer using the Le Creuset for caramel because the light colored interior allows me to easily judge the color of the sugar as it caramelizes. If you don’t have a dutch oven, any heavy bottomed large saucepan will do, but make sure it has at least twice the volume capacity as the volume of liquids you will be adding. Caramel bubbles violently when cream is added to the melted sugar, and if you don’t have a large enough pan, you’ll end up with a painful mess.
Have everything prepared before you start caramelizing the sugar. Line and butter the pan that you’ll be pouring the caramel into. Get all the ingredients measured and nearby. Have all your utensils at the ready (a whisk and a heat-proof rubber spatula are essential). Make sure you understand the markings on your candy thermometer and can recognize the correct temperature at a glance. And make sure your candy thermometer reads true. (The manufacturer should have instructions on testing it, but an easy test is to boil water and observe whether it reads accurately and immediately. Some thermometers have a delay, and when making caramel, even a few extra seconds can ruin the final texture by taking the caramel above the desired temperature).
Caramel is a challenge because it can work perfectly one time and seize (sugar harden) the next, but a little confidence and persistence goes a long way. And the results are worth the occasional headache.
Apple Cider Caramels
Yield: about 120 caramels
Ingredients
8 cups apple cider
1 tsp. ground cinnamon
2 tsp. flake sea salt, such as Maldon
16 Tbsp. unsalted butter, sliced
2 cups granulated cane sugar
1 cup packed light brown sugar
2/3 cup heavy cream, not ultrapasturized if possible
Instructions
Add the apple cider to an enameled cast iron dutch oven or heavy bottomed saucepan, at least 5 quart capacity. Bring the cider to a boil over medium-high heat. Allow to boil, stirring occasionally, until the cider has reduced to a dark, thick syrup. By volume it should reduce down to 2/3rd to 1 cup of syrup. I ladle it into a measuring cup to check volume. It can take 2+ hours to reduce to the correct volume. (Note: for a more intense cider flavor, reduce it to 2/3rd cup, for a less intense flavor, reduce it to 1 cup).
While the cider is reducing, a 9×13 baking dish. Cut parchment paper to fit the bottom of the dish. I butter the entire dish, place down the cut parchment paper, and then butter around the edges to “seal” the parchment to the dish so that no caramel gets under the parchment paper.
When the cider has reduced, remove the pan from the heat and add in the butter, sugars, and cream. Affix your candy thermometer to the side of the pan being sure not to let the bulb touch the bottom of the pan. Stir to mix, and then occasionally until the mixture registers at 252 F. (This is where you need to really pay attention and know your thermometer. If it is slow to register, you’ll pass 252 F without knowing it and end up with hard candies). Once it reaches 252 F, remove it from the heat immediately and stir in the cinnamon and salt. Carefully pour the mixture into your prepared baking dish, using a heat proof rubber spatula to scrape every last bit into the dish. (I often enlist a helper because holding a dutch oven in one hand while scraping with the other is cumbersome).
Let the caramel set for 30 minutes to an hour before sprinkling with additional flake sea salt. If you add it too soon, it won’t set on top of the caramels. Allow the caramels to cool fully. When ready to cut, remove the slab of caramel from the dish onto a cutting board. Slice into 1 inch strips using either a lightly buttered knife or pizza cutter, or a knife that has been warmed over a flame or via hot water. Slice each strip into 1 inch squares. Wrap in parchment paper or wax paper squares. (I’d pre-cut these while the caramel is cooling). Store at room temperature or in the refrigerator.
Slightly adapted from: Annie’s Eats

 RSS Feed