Sweet Meggie J's
  • Home
  • About

Vanilla Bean Rhubarb Scones with Ginger

5/4/2014

0 Comments

 
Most of the time I like the fact that certain fruits and vegetables are only in season part of the year.  It helps mark the passing of time and gives me something to look forward to.  Pumpkin signals the start of fall.  Cranberries signal the start of the holiday season.  Peaches and sweet corn the waning days of summer.  And for the most part, I'm fine waiting.  Except when it comes to rhubarb.  I don't want to wait for rhubarb season.  I love rhubarb.  And so when I saw rhubarb in the store the other week, I could hardly contain my excitement.  

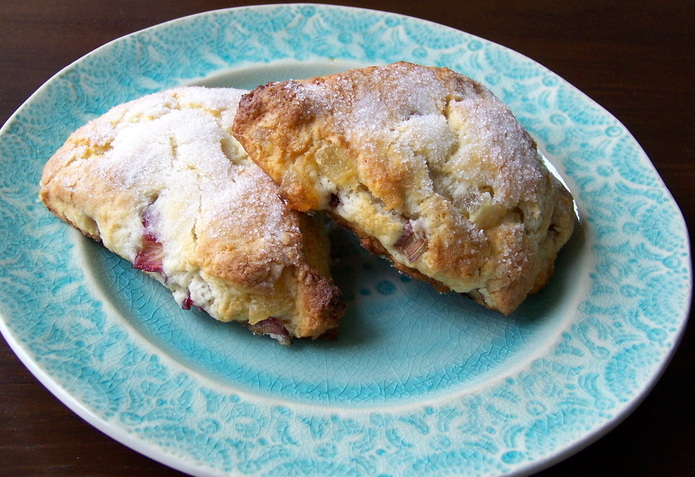
My dad has always adored strawberry rhubarb pie, and usually, that is what I make with rhubarb.  But since it's just me, the idea of making an entire pie right now did not seem the wisest.  I remembered bookmarking this recipe for rhubarb scones, however, and decided that scones would be perfect.  Scones don't keep all the well once baked up, but they freeze beautifully, allowing you to bake them as needed.  Perfect when cooking for one.  I love anything with flecks of vanilla bean, and these scones are no exception.  But of course my favorite part is the slightly tart puddles of rhubarb that form against the backdrop of fragrant, not-too-sweet dough.  
Picture

Vanilla Bean and Rhubarb Scones with Ginger
Yield:  12 scones

Ingredients
3 stalks of rhubarb, cut into ¼-inch slices (approximately 1 cup)
½ cup granulated sugar, divided
Seeds scraped from 1 vanilla bean
2 ½ cups all-purpose flour
1 tablespoon baking powder
½ teaspoon salt
½ cup unsalted butter, cold and cut into small chunks
¼ cup chopped crystallized ginger
1 cup heavy cream

Granulated or turbinado sugar, for sprinkling


Instructions
Preheat oven to 425º F.  Line baking sheet with parchment paper

In a small bowl, toss the sliced rhubarb with 3 of the tablespoons of sugar.  Set aside.

Place the remaining sugar (1/2 cup less 3 tablespoons) in a large bowl.  Scrape the seeds from the vanilla bean into the bowl.  With your fingers, rub the vanilla into the sugar until evenly distributed and fragrant.  Add the flour, baking powder, and salt to the bowl.  Whisk to combine.

Using a pastry blender, cut the butter into the flour mixture until the butter is well integrated with no pieces larger than the size of a pea.  Stir in the rhubarb and ginger, making sure to coat everything evenly with the flour. 

Pour the heavy cream into the flour mixture.  With a wooden spoon, stir until all the cream has been incorporated.  Turn the dough onto a lightly floured board and knead to bring the dough together.

Divide the dough into two even parts and pat each into a 7-inch circle.  Cut six triangles out of each circle.  Place the triangles on the prepared baking sheet and sprinkle with granulated or turbinado sugar. 

Bake until the scones are set and golden brown, 18-25 minutes.  Cool on the baking sheet for 15 minutes.  Scones keep for up to 3 days, but are best fresh.

The unbaked scones freeze very well so that you can bake them off as needed.


Slightly adapted from Brown Eyed Baker    

0 Comments

Cannoli Cupcakes

3/17/2014

0 Comments

 
Picture
Several weeks ago I was invited to a small dinner party that turned into a bit of a surprise birthday celebration for one of the hosts.  Since I’m known for my love of baking, I was asked to bring a birthday dessert.  I then proceeded to scheme for the rest of the afternoon, trying to decide what to make. 

My first thought was this gorgeous blood orange loaf cake that I made at the beginning of February and had wanted to make again ever since the last slice of that loaf was consumed.  But a loaf cake didn’t seem “birthday” enough, even though it is absolutely stunning and delicious.  So I decided to make blood orange loaf cake AND something else. 

After more brainstorming, the idea of cannoli stuck in my head.  Since I don't have cannoli forms, I contemplated cannoli cups, but those can’t be filled until just before serving, and I needed something I could prepare ahead of time.  I looked into a cannoli tart, but then remembered I don’t have a tart pan with me.  And then I landed on the answer:  cupcakes, cannoli cupcakes. 

I thought for sure there would be some killer cannoli cupcake recipe out there, one with tons of rave reviews.  But I could not find such a killer recipe.  Nothing looked quite right.  I didn’t just want a yellow cupcake with ricotta or mascarpone frosting.  And recipes that called for pistachios were out because I can’t eat them.  I decided to chance it and come up with my own recipe for cannoli cupcakes, knowing that if they failed, the blood orange cake would be enough to fulfill my dessert obligations.
Picture
I started thinking about what would make a good cupcake base for cannoli cupcakes.  Yellow cake seemed too … yellow.  Brown sugar, it had to involve brown sugar.  And maybe chocolate chips for added interest.  With the addition of cinnamon and Marsala wine to bring in some of the flavors of cannoli shells.  The base from Annie’s chocolate chip cookie dough cupcakes seemed the perfect starting point. 

For the frosting, I ruled out ricotta because I wanted a smooth, creamy frosting, and ricotta is too grainy.  Mascarpone and cream cheese sprinkled with chocolate chips sounded divine.  But after trying a cupcake with just the frosting, I was disappointed to discover it didn’t really taste like cannoli.  To fix this, I knew I would need to fill the cupcakes with a traditional ricotta cannoli filling.  This time, when I tasted the finished cupcake, it had the cannoli flavor profile that I was after.  Perfect.

Both the blood orange cake and the cannoli cupcakes were a great success and rounded out the Italian theme of the dinner quite nicely. 
Picture
Cannoli Cupcakes
Yield: 24 cupcakes

Ingredients

For the Cupcakes
3 sticks unsalted butter, at room temperature
1 ½ cups light brown sugar, packed
4 large eggs
2 2/3 cups all-purpose flour
1 teaspoon baking powder
1 teaspoon baking soda
1/2 teaspoon cinnamon
1/4 teaspoon salt
1 cup milk
2 teaspoons Marsala wine or vanilla extract
1 cup miniature chocolate chips

For the Filling 
1 1/2 cups whole milk ricotta cheese
½ cup powdered sugar
2 Tablespoons miniature chocolate chips
½ teaspoon vanilla extract, optional

For the Frosting
2 sticks unsalted butter, at room temperature
16 ounces Mascarpone cheese, at room temperature
16 ounces cream cheese, at room temperature
5 cups powdered sugar
Miniature chocolate chips for garnish
Waffle cones dipped in chocolate for garnish


Directions

For the cupcakes
Preheat the oven to 350º F.  Line cupcake pans with paper liners. 

In the bowl of a stand mixer fitted with the paddle attachment, cream the butter and brown sugar on medium-high until light and fluffy, about 3 minutes.  Mix in the eggs one at a time, beating well after each addition.

In a medium bowl, whisk together the flour, baking powder, baking soda, cinnamon and salt.  Add the dry ingredients to the mixer bowl on low speed, alternating with the milk, beginning and ending with the dry ingredients, mixing each addition until just incorporated.  Stir in the wine.  Fold in the chocolate chips with a spatula.

Divide the batter between the cupcake liners.  Bake 18-20 minutes, until a toothpick inserted in the center comes out clean.  Allow cupcakes to cool in pan 5-10 minutes, then transfer to wire rack to cool completely.

For the Filling
In the bowl of a stand mixer fitted with a paddle attachment, beat the ricotta on medium speed for 1 minute to cut down on the graininess of the cheese.  Add in the powdered sugar and vanilla, if using, and beat until smooth, approximately 2 to 3 minutes.  Add more powdered sugar to taste.  Stir in the chocolate chips. 

Set a fine mesh strainer lines with cheesecloth over a bowl large enough that the strainer is not touching the bottom.  Empty the filling into the cheesecloth.  Place in the refrigerator and allow to drain for 5 hours or overnight to remove excess liquid. 

To fill the cupcakes, use either a cupcake plunger or a paring knife to remove a section of the cupcake.  For the paring knife method, use the paring knife to cut a cone-shaped section (made by cutting a circle in the top of the cupcake with the knife angled at 45ª) out of the center of the cupcake.  Remove this section and slice off the top of the cone to create a cap, leaving a thin circle that can be used to “plug” the hole left in the cupcake, and discarding the rest.  Fill the hole in the cupcake with the ricotta filling and then place the cap over the hole.  If too much of the filling leaks out the top, scrape it off so that you have a smoother area to frost.

For the Frosting
In the bowl of a stand mixer fitted with the paddle attachment, beat butter, mascarpone, and cream cheese together on medium speed until well combined. Add powdered sugar until light and fluffy. Using a spatula, stir in vanilla extract.  Chill until ready to use.

After the cupcakes have been filled, frost as desired.  (Note:  I found this frosting too thick and finicky to use with a closed star tip).  Garnish with miniature chocolate chips and waffle cone (or bowl) shards dipped in chocolate.


Cupcake base adapted from Annie's Eats 
Frosting adapted from Tasty Kitchen 
Garnish from Confessions of a Cookbook Queen

0 Comments

DLM Killer Brownies / Knock You Naked Brownies

2/21/2014

0 Comments

 
Picture


I went to university in Ohio.  There are many things to love about my undergrad university.  Its proximity to this amazing place called Dorothy Lane Market is one such thing.  You see, Dorothy Lane Market is this gourmet grocery in Dayton.  In addition to having an amazing selection of high quality grocery items, Dorothy Lane Market has this bakery, this fantastic bakery that surpasses all other grocery store bakeries by leaps and bounds and rivals the best standalone bakeries.  Oh, Dorothy Lane Market, how I love thee!  How I miss living only an hour away from thee!

Dorothy Lane Market is known for their brownies, their registered trademark Killer Brownies.  Full disclosure, I have never actually had the Original Killer Brownie because, well, it has nuts, and nuts and I do not mix.  But I have had their "Not a Nutter" Killer Brownie, and it is sublime.  Sublime.  I was back in Ohio at the start of the year and dropped a good $20 on Killer Brownies to give to friends (and eat for myself).  Pricey but so good and so worth it.  

At first, I wasn't sure if I'd like Killer Brownies.  I don't eat brownies that often, and when I do, usually they are on the fudgier side.  Killer Brownies are definitely not fudgy.  But they aren't exactly cakey.  A layer of brownie topped with a layer of caramel topped with another layer of brownie, and somehow, it all comes together to form this absolutely perfect confection that is best consumed in tiny squares because of all the rich goodness.  

As I no longer live within an hour of these most perfect brownies, I was excited to discover that Ree, the Pioneer Woman, fell victim to the Killer Brownie and decided to recreate them at home.  This recipe is similar to my beloved Killer Brownies, but the original is still the best, so if you are so inclined, go to Dayton or order them online.  Otherwise, give this recipe a try.  

Although I usually shy away from box mixes, I didn't want to waste 60 caramels only to find out that a completely from scratch recipe didn't work.  So box mix it is.  Maybe in the future I'll be braver.  

Picture


Knock You Naked Brownies


Ingredients

1 box German Chocolate Cake Mix (I used Betty Crocker)
1/3 cup evaporated milk
1/2 cup butter, melted
1 cup finely chopped pecans, optional (I did not use nuts in mine)
60 chewy caramel candies, unwrapped
1/2 cup evaporated milk (additional)
1/3 cup semi-sweet chocolate chips
Powdered sugar for dusting

Directions

Preheat oven to 350º F.  Thoroughly grease a 9x9 baking pan.  

In a large bowl, mix together the cake mix, melted butter, and the 1/3rd cup of evaporated milk (if you are using pecans, add them here).  The mixture should come together to form a thick batter.  Divide the mixture in half.  Press half the mixture into the bottom of the prepared baking pan.  Bake for 8 to 10 minutes.  Remove pan from oven and set aside.

Meanwhile, in a glass or metal bowl set over a pan of simmering water (a double boiler setup), combine the caramels and the 1/2 cup of evaporated milk.  Allow mixture to melt completely, stirring occasionally.  Pour the melted caramel mixture over the brownie base.  Sprinkle with the chocolate chips.

On a work surface, turn out the remaining brownie batter and form into a square roughly the size of the pan.  Using a spatula, remove it from the work surface and place atop the caramel and chocolate chip layer.  This step can be difficult.  If it falls apart, do your best to cover as much of the caramel with brownie batter.  

Bake for 20 to 25 minutes.  Remove to a cooling rack and allow to cool to room temperature.  Once it reaches room temperature, cover and refrigerate for several hours.  When ready to serve, dust generously with powdered sugar.  Slice and enjoy!

Adapted from The Pioneer Woman Cooks

0 Comments

Chocolate Chip Meringue Cookies

2/16/2014

0 Comments

 
Picture
I love to bake.  No, really, it's a compulsion.  A compulsion that is not exactly the most convenient when living alone.  I don't like wasting good food, but even halving most recipes means way more of a baked good than I need in my life.  So while I want to try a different cobbler, cupcake, and tart recipe every day, that just isn't practical.  I try to satisfy my baking compulsion by creating delicious, healthy lunches and dinners, but that only goes so far because, well, living alone means everything I make creates leftovers, and I can't very well be creating leftovers every day.  It's a vicious cycle.  


Cue the meringue cookies.  These cookies allow me to get in the kitchen and bake without creating something incredibly caloric or full of gluten or that requires taking a Lactaid pill.  And these taste DELICIOUS.  They aren't some throwaway healthy treat.  They are full on treat that just so happens to be sort of healthy-ish.  This is an incredible recipe that tastes reminiscent of chocolate chip cookies but is so much lighter.  

If you've never tried your hand at meringues, this is the recipe to change that.  They come together in minutes and with very few ingredients.  They are a particularly great use for leftover egg whites from making a yolk-heavy dish.  The key to meringues is a very clean bowl--any oil can prevent the egg whites from whipping up properly--and deliberate timing--the sugar must be added slowly after the egg whites have formed soft peaks.  

Picture
Chocolate Chip Meringue Cookies
Yield: about 2 dozen

Ingredients
2 large egg whites, at room temperature (this is important)
1/4 teaspoon salt
1/8 teaspoon cream of tarter
1 teaspoon vanilla extract
1/2 cup granulated sugar
6 ounces miniature semi-sweet chocolate chips

Instructions
Preheat oven to 300º F and line baking sheets with parchment paper.

In the bowl of a stand mixer fitted with the whisk attachment, beat the room temperature egg whites on medium-high speed until they foam, approximately 1 minute.  Add the salt, cream of tarter, and vanilla to the foamy egg whites.  Beat on high until the mixture forms soft peaks, 1 to 2 minutes.  With the mixture on medium-high speed, slowly add in the sugar.  It is important to incorporate the sugar slowly.  The whole process of adding the sugar should take approximately 30 seconds.  Once the sugar has been incorporated, turn the mixer on high and whip until the mixture forms stiff peaks, 1 to 2 minutes.  Gently fold in the chocolate chips, being careful not to deflate the egg whites.

Working quickly, spoon the mixture onto the prepared baking sheets.  I use a 2 tablespoon cookie scoop, but smaller works too, just decrease the cooking time.  Bake for 30-35 minutes.  They should be tan and lift from the parchment paper fairly easily.  Allow to cool on a cooling rack.  Enjoy!

Slightly adapted from Smitten Kitchen
0 Comments

New York Style Crumb Cake

2/6/2014

3 Comments

 
Picture
Crumb cake is one of those foods with a great name.  Every time I'm out somewhere that has crumb cake, it takes all my restraint not to order a slice.  Butter, cinnamon, brown sugar, so much deliciousness potential.  But often, that's all it is: potential.  Frequently crumb cakes are too dense, too dry, too bland.  The crumbs are either excessively sweet or disturbingly few.  The cinnamon too muddled by a heavy cake.  So much potential, and so much disappointment.  

But the folks over at Cook's Illustrated have done it again.  Have turned that potential into reality.  Into a crumb cake that is so good I've made three batches in the past two days.  So good that I drove out at 10 PM in subzero weather to pick up more cake flour and butter.

This is a New York style crumb cake.  That means no swirl of streusel in the cake, nothing to disturb the perfection of the impossibly light, fluffy, buttery cake.  Nothing to compete against the perfect, moist crumbs piled high on top.  Oh, oh, oh is this a perfect cake.  

The secret is in the cake flour.  It is absolutely essential to keeping this cake moist, light, and fluffy.  The crumb of the cake (rather than the crumb atop the cake) is deliciously fine but sturdy enough to be eaten out of hand.  Miracle food.  


New York Style Crumb Cake

Serves 8 to 10

Ingredients
Crumb Topping

8 Tbsp. unsalted butter, melted
1/3 cup granulated sugar (2 1/3 ounces)
1/3 cup packed dark brown sugar (2 1/3 ounces)
3/4 tsp. ground cinnamon
1/8 tsp. salt
1 2/3 cup cake flour (6.5 ounces)

Cake

1 1/4 cup cake flour (5 ounces)
1/2 cup granulated sugar (3 1/2 ounces)
1/4 tsp. baking soda
1/4 tsp. salt
6 Tbsp. unsalted butter, cut into 6 pieces and softened
1/3 cup buttermilk, shaken well
1 large egg plus 1 large egg yolk
1 tsp. vanilla extract
Confectioners' sugar for sprinkling

Instructions

Place oven rack in the upper-middle position.  Heat to 325º F.  Using aluminum foil, make a sling to line an 8-inch baking pan.  (Fold a sheet of aluminum foil so that it is 8 inches wide.  Repeat.  Place one sheet in the baking pan so that the edges are hanging over the side.  Take the second sheet and place perpendicular to the first.  Smooth the foil so that it is flush to the pan.)

To make the topping:  In a medium bowl, combine the granulated sugar, brown sugar, cinnamon, and salt.  Whisk until combined.  Add in the melted butter and whisk until smooth.  Add in the cake flour, stirring with a rubber spatula or wooden spoon until the mixture comes together into a thick dough.  (It should get very thick and hard to work with.  Just make sure all the flour has been incorporated.)  Allow the dough to cool to room temperature, at least 10 to 15 minutes.  This is VERY important.  If the crumb dough has not cooled properly, it will sink into the cake while baking rather than sit atop it.

To make the cake:  In a stand mixer fitted with the paddle attachment, mix the cake flour, sugar, baking soda, and salt on low speed until combined.  Add the softened butter one piece at a time, mixing after each addition.  Continue beating until the mixture resembles moist crumbs, with no visible butter chunks remaining, 1 to 2 minutes.  Add the buttermilk, egg, egg yolk, and vanilla.  Beat on medium speed until light and fluffy, about 1 minute.  Make sure to scrape the bowl as needed.

Pour the batter into the prepared 8-inch baking pan.  Spread into an even layer.  Take the room temperature crumb dough and, using both hands, break apart the dough into pea size pieces.  Starting at the edges of the pan, layer the crumb topping over the batter, gradually working your way toward the center of the pan.  Bake until crumbs are golden and a toothpick inserted in the center of the cake comes out clean, 30 to 35 minutes.  Let cool on a wire rack for 30 minutes.  Remove from the pan using the foil sling.  Dust with confectioners' sugar just before serving.

Slightly adapted from Cook's Illustrated Baking Book


3 Comments

Chicken Tikka Masala

1/29/2014

0 Comments

 
Picture
Picture
Chicken Tikka Masala has to be one of my favorite savory foods of all time.  When done right, it has beautiful chunks of spiced, roasted chicken and a wonderfully aromatic, richly flavored creamy tomato sauce.  Served atop basmati rice with a side of naan bread, it is a heavenly, comforting, crave-worthy meal.  And crave it I do.

Where I went to college, there was this little hole-in-the-wall Indian restaurant that started out serving in styrofoam takeout containers and eventually graduated to real plates and silverware.  Well, this place has the BEST Chicken Tikka Masala I have ever had in my life.  My roommate and I used to order from there almost every Sunday night.  Sometimes I crave their food so badly that the 4 hour drive seems totally worth it and doable just to get Indian food and then drive 4 hours back home.  Yeah.  It is that good.  

Ever since moving away from the best Indian ever, I have been on a quest to find a Chicken Tikka Masala that I like even half as much.  A fanatical quest. I have found one place that is decent but ridiculously expensive and still not on par.  And I have found many, many places that are just terribly disappointing.  

At some point, I decided to try making Chicken Tikka Masala at home.  It is still not quite as good as the delicious concoction from my college days, but it is better than all the other restaurant efforts I have tried, by a lot, and I have now made this more times than I can count.  In fact, we like this so much that I served it for Christmas a year ago, and when my cousins begged for it to make a return appearance this year, I was more than happy to oblige.  The nice thing is that you can customize the spice level and flavor profile to suit your needs.  For Christmas when there are younger kids around, I keep the cayenne to a minimum and dial down the Garam Masala slightly, which isn't hot but has a more intense flavor.  When it's me, I up the spicy and up the Indian flavor punch from the Garam Masala.  Seriously good eats, either way.


Chicken Tikka Masala

Serves 8

Ingredients
Chicken Tikka

3 tsp. ground cumin
3 tsp. ground coriander
3 tsp. cayenne pepper
1 tsp. kosher salt
8 boneless, skinless chicken breasts split in half (best quality)
3-4 cups plain whole-milk or Greek yogurt
6 Tbsp. vegetable oil
10 cloves garlic, minced
5 Tbsp. grated fresh ginger

Sauce

4 Tbsp. butter
2 large onions, diced
8 cloves garlic, minced
1-2 Tbsp. grated fresh ginger
1/3 c. Garam Masala (more if desired)
Cayenne pepper to taste
2 tsp. sweet paprika
1 Jalapeño, seeded and diced
2 (28 oz) cans diced tomatoes
2 Tbsp. sugar
3 c. heavy cream

Instructions

To season the chicken, combine the cumin, coriander, cayenne, and salt.  Sprinkle liberally on both sides of the chicken breasts.  Set on a platter, cover with plastic wrap, and refrigerate for 1 hour (or more), if time allows.  Meanwhile, combine the yogurt, oil, minced garlic, and ginger in a large bowl.  Dip each chicken breast into the yogurt mixture to coat.  Place the coated chicken back on a platter and refrigerate for another hour, if time allows. 

To cook the chicken, wrap a baking sheet in aluminum foil.  (Be careful here as you don’t want the sauce to leak through and burn onto the pan).  Set a metal cooling rack on the foil-lined baking sheet and spray the cooling rack with cooking spray or brush lightly with oil.  Set the chicken on the cooling rack.  Place 10-12 inches below a broiler and broil for 5-7 minutes per side.  (Watch to make sure all the chicken pieces are cooking evenly).  Use a thermometer to check for doneness.  It should register at least 165º F.  Set the cooked chicken aside, allowing it to get cool enough to handle.

For the sauce, melt the butter in a large Dutch oven over medium-high heat.  Add the diced onions and sauté until golden brown.  When onions are golden brown, add the garlic and ginger along with 1 tablespoon of salt.  Stir.  Add the Garam Masala, paprika, and cayenne pepper along with the diced Jalapeño.  Let cook for 1 minute, then add the diced tomatoes and the sugar.  Stir, scraping the bottom of the pan.  (The acidity of the tomatoes will deglaze the pan, releasing the burnt bits).  Allow to simmer for 5-10 minutes.  Check seasoning and adjust accordingly.  Often I will add more Garam Masala and heat at this point.

Using an immersion blender, purée the sauce until smooth.  (A blender can be used if you do not have an immersion blender).  Once puréed, add the heavy cream, stir well, and allow to simmer for another 5 minutes.  While simmering, shred the chicken breasts.  I like to do this using two forks.  Throw the shredded chicken into the sauce.    

Serve with basmati rice and naan.  (I’ve made my own naan, but find that the naan available in the freezer section of Trader Joe’s very tasty and very easy).  This makes great leftovers.

Heavily adapted from Cook's Illustrated and The Pioneer Woman 


0 Comments

Alsatian Apple Cake (Elsässer Apfelkuchen)

1/5/2014

0 Comments

 
Picture
Picture
I love all things apple.  Sautéed apples, baked apples, apple crumble, apple pie, apple tart, apple cake.  All things apple.  But this Alsatian apple cake has to be one of the best apple things I have ever tasted.  It combines a shortbread crust with beautiful vanilla bean flecked custard, all dotted with wonderfully tart Granny Smith apples.  Crème brûlée meets apple tart meets shortbread cookie.  It’s genius.

This isn’t a terribly sweet cake, and that is precisely what makes it so wonderful.   It could be served at brunch with coffee or at afternoon tea or after a wonderful dinner.  For dessert, I like to pair it with homemade caramel sauce because really, homemade caramel sauce needs no excuse.  It would also pair nicely with homemade whipped cream, crème anglaise, or ice cream.

This is a European recipe so it requires the use of a kitchen scale, but really, I prefer using a kitchen scale when baking for precision purposes.


Alsatian Apple Cake

Serves 6-8

Ingredients
For the Crust

200 grams unbleached all-purpose flour
30 grams granulated sugar
105 grams unsalted butter (I use a European butter like Plugra, but American butter will do)
1 large egg yolk
1/4 tsp. kosher salt
2 Tbsp. plus 1 tsp. water

For the Apples

3-4 Granny Smith apples, depending on size
2 Tbsp. freshly squeezed lemon juice

For the Custard

100 grams granulated sugar
3 large eggs
125 mL heavy cream (a smidge more than half a cup)
Seeds from one vanilla bean
1 tsp. vanilla extract

Instructions

In the bowl of a stand mixer fitted with the paddle attachment, combine the flour, butter, egg yolk, sugar, salt, and water.  Mix until the ingredients come together.  It will be crumbly.  Use a rubber spatula to pat together into a disc.  Cover the dough in plastic wrap and refrigerate for 1-2 hours.

Peel, core, and quarter the apples.  Score the apples lengthwise almost cutting through to make slices, but leaving the quarters intact.  Mix with the lemon juice in a medium size bowl.

Preheat oven to 400º F.

Roll the dough into an 11-inch round and lay it in a 9-inch spring form pan.  Pierce the dough with a fork in several places.  Arrange the apples on top of the dough to form an outer ring of apples with one of the apple quarters in the center.  Bake for 25-28 minutes until the apples have started to soften nicely.

Meanwhile, beat together the sugar and eggs.  Add the cream, vanilla bean seeds, and vanilla extract, and whisk until smooth and well incorporated.  Pour over the apple cake and bake for another 20-25 minutes, until the custard is set and slightly browned on top.

Let cool to room temperature, then chill in the refrigerator.  Serve chilled.

Adapted from Hafentelegramm


0 Comments

Apple Cider Caramels

1/3/2014

0 Comments

 
Picture
I’ve always had a thing for chemistry.  It might have been the beakers and erlenmeyer flasks my dad would bring home and set on his workbench.  Or maybe the beautiful way it seemed to explain the world.  Either way, I love chemistry.  Which is probably why I love baking.  Baking is edible chemistry.

I love a good challenge in the kitchen.  Laminating dough for croissants, perfecting royal icing, tempering chocolate, and anything caramel.  Caramel sauce, caramel candies, caramel filling, I love making it all because caramel is a challenge.  (It also smells like some of my earliest forays into chemistry experiments).

This holiday season, I made a great deal of caramel in a great many varieties.  These apple cider caramels are my favorite, but, in the interest of full disclosure, I love pretty much anything apple.  This recipe takes time to make, but it is so worth it.  Hide-them-in-the-back-of-the-uppermost-cabinet  worth it.

I like to make my caramel in an enameled cast iron dutch oven for its heavy bottom and even heating ability.  I have both a Staub and a Le Creuset dutch oven, and I prefer using the Le Creuset for caramel because the light colored interior allows me to easily judge the color of the sugar as it caramelizes.  If you don’t have a dutch oven, any heavy bottomed large saucepan will do, but make sure it has at least twice the volume capacity as the volume of liquids you will be adding.  Caramel bubbles violently when cream is added to the melted sugar, and if you don’t have a large enough pan, you’ll end up with a painful mess.

Have everything prepared before you start caramelizing the sugar.  Line and butter the pan that you’ll be pouring the caramel into.  Get all the ingredients measured and nearby.  Have all your utensils at the ready (a whisk and a heat-proof rubber spatula are essential).  Make sure you understand the markings on your candy thermometer and can recognize the correct temperature at a glance.  And make sure your candy thermometer reads true.  (The manufacturer should have instructions on testing it, but an easy test is to boil water and observe whether it reads accurately and immediately.  Some thermometers have a delay, and when making caramel, even a few extra seconds can ruin the final texture by taking the caramel above the desired temperature).

Caramel is a challenge because it can work perfectly one time and seize (sugar harden) the next, but a little confidence and persistence goes a long way.  And the results are worth the occasional headache.

Apple Cider Caramels

Yield: about 120 caramels

Ingredients

8 cups apple cider
1 tsp. ground cinnamon
2 tsp. flake sea salt, such as Maldon
16 Tbsp. unsalted butter, sliced
2 cups granulated cane sugar
1 cup packed light brown sugar
2/3 cup heavy cream, not ultrapasturized if possible

Instructions

Add the apple cider to an enameled cast iron dutch oven or heavy bottomed saucepan, at least 5 quart capacity.  Bring the cider to a boil over medium-high heat.  Allow to boil, stirring occasionally, until the cider has reduced to a dark, thick syrup.  By volume it should reduce down to 2/3rd to 1 cup of syrup.  I ladle it into a measuring cup to check volume.  It can take 2+ hours to reduce to the correct volume.  (Note: for a more intense cider flavor, reduce it to 2/3rd cup, for a less intense flavor, reduce it to 1 cup).

While the cider is reducing, a 9×13 baking dish.  Cut parchment paper to fit the bottom of the dish.  I butter the entire dish, place down the cut parchment paper, and then butter around the edges to “seal” the parchment to the dish so that no caramel gets under the parchment paper.

When the cider has reduced, remove the pan from the heat and add in the butter, sugars, and cream.  Affix your candy thermometer to the side of the pan being sure not to let the bulb touch the bottom of the pan.  Stir to mix, and then occasionally until the mixture registers at 252 F.  (This is where you need to really pay attention and know your thermometer.  If it is slow to register, you’ll pass 252 F without knowing it and end up with hard candies).  Once it reaches 252 F, remove it from the heat immediately and stir in the cinnamon and salt.  Carefully pour the mixture into your prepared baking dish, using a heat proof rubber spatula to scrape every last bit into the dish.  (I often enlist a helper because holding a dutch oven in one hand while scraping with the other is cumbersome).

Let the caramel set for 30 minutes to an hour before sprinkling with additional flake sea salt.  If you add it too soon, it won’t set on top of the caramels.  Allow the caramels to cool fully.  When ready to cut, remove the slab of caramel from the dish onto a cutting board.  Slice into 1 inch strips using either a lightly buttered knife or pizza cutter, or a knife that has been warmed over a flame or via hot water.  Slice each strip into 1 inch squares.  Wrap in parchment paper or wax paper squares.  (I’d pre-cut these while the caramel is cooling).  Store at room temperature or in the refrigerator.

Slightly adapted from: Annie’s Eats


0 Comments

    Author

    I'm Meg.  I love creating delicious food.  I also love all things apple.

    Picture

    Archives

    February 2014
    January 2014

    Categories

    All

    RSS Feed


Powered by
✕